Scan your photographs at an
appropriate size, as described above. If the pictures are black and
white, make sure they are saved as greyscale to keep file sizes small.
If you are scanning pictures from books or magazines, use the "descreen"
option to remove the dot patterns from the published picture. Inserting
a sheet of black paper between pages helps prevent text showing through
from other pages. If you have photos supplied to you from other sources,
check the image/file size is not too large, and reduce the size if
necessary.
 |
|
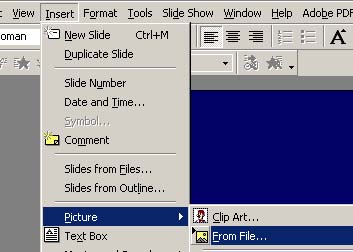
Open your PowerPoint
slide, click on "insert" then "Picture", and
"From File" From the window that appears, browse
to the folder where you have saved your picture, select it and
click on "insert". The picture will now appear in your
slide. |
- A sample image at 10.5"x7.5", 100dpi saved as a
jpeg has a file size of 136Kb. The same picture saved as a
bitmap is 2.2Mb
- If you only have one photo in a slide, use all the
available space.
- If you have more than one photo in a slide, use a dark
blue or black background, (white backgrounds tend to glare,
and distract from the pictures)
- To view example, click here.
- You may be able to reduce the file size of existing
presentations.
Click here for details
|
|
|
|